Disclaimer: I am not an investment advisor. When I describe my own trading activities, it is not intended as advice or solicitation of any kind.

12 October 2011

Applications: ThinkOrSwim

See Time For a Change for the first in this series, or view the index to see all the posts dealing with Arch Linux. After taking some time off from setting up my new model Arch home (primarily for repairing my real home), I'm continuing with application installation. Before I started, I took a VirtualBox snapshot in case I had to roll back. I called "After Easys", for obvious reasons.

Today, I tackled ThinkOrSwim, which I use for options trading. This isn't in any repositories, so I had to log into my account at TD Ameritrade (ThinkOrSwim's new owner), and go to their download page. It automatically detected I was on Linux, and gave me a handy link to click to download "thinkorswim_installer.sh". Then it was a simple matter of giving that script execute permission and running it, and I was off to the races.

$ chmod u+x thinkorswim_installer.sh
$ ./thinkorswim_installer.sh

But there were a couple of little wrinkles. The default install location is /usr/local/thinkorswim, but a normal user doesn't have write access to that directory. So it's important to change it to be somewhere the user has access to - in this case, I chose /home/mark/thinkorswim. You might think that simply installing it with "sudo" is the right answer, but no. Do that, and it refuses to run for a non-root user. The Java-based installer also fails to create any icons (known as launchers in Linux) in KDE, so it needs some manual assistance.

I remember when I installed ThinkOrSwim on my Gnome-based Ubuntu desktop, it managed to create a launcher on the desktop, so it must be that KDE confuses it somehow. First, I looked around in the /home/mark/thinkorswim directory to see if anything looked helpful. What I was looking for was, at the least, a guess at what the command is to launch it, or at most, a pre-made launcher that just needs to be put somewhere useful.

In the thinkorswim subdirectory, I found a couple of useful files:
  • An executable script called "thinkorswim" (go figure) that prepped and ran the Java Virtual Machine (JVM) with the right parameters to launch ThinkOrSwim
  • A little textfile called "thinkorswim.desktop" that had some configuration options that looked like they might be for a launcher:
[Desktop Entry]
Type=Application
Name=thinkorswim
Exec=/bin/sh "/home/mark/thinkorswim/thinkorswim"
Icon=/home/mark/thinkorswim/.install4j/thinkorswim.png
Categories=Application;
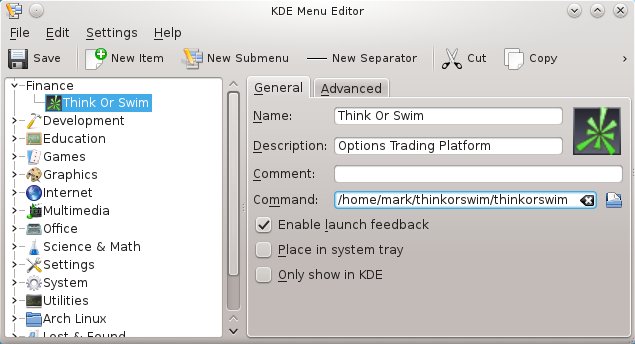
If I knew KDE a little better, I'm guessing I could just copy this thinkorswim.desktop file somewhere and have it magically show up in the right place in the menus. Since I don't, I'll just use the GUI menu editing utility to put the information in manually. I added a new menu group called Finance, and created a new item under it called Think Or Swim. Then I entered the information from the "desktop" file to the menu editor, as shown below:


After hitting "Save", my new group and icon for Think Or Swim showed up just as I wanted them to.

One down, nine to go!

  • PasswordSafe for secure password management
  • Moneydance for personal finance
  • ThinkOrSwim for option trading DONE!
  • Minecraft - thought this would be easy, but it crashed on my first attempt
  • Dropbox for cloud storage
  • Kontact for e-mail, contacts, and calendar
  • Choqok for micro-blogging (following and posting to Twitter)
  • NixNote for notes/personal organization
  • Bless hex editor
  • Bacula for automated backups


  • Next: Okteta and Choqok
    Or check out the Index

    10 October 2011

    Happy 1983

    Things are really starting to heat up in the Year-a-Month project now that we're into the 1980s. I may have to start breaking years up over two months, just to control the costs!

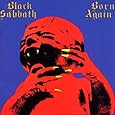
    Black Sabbath: Born Again - OK, yes, that's a disturbing cover. But more of a shock was hearing Ian Gillan doing the vocals. Sabbath sounds completely different with Gillan at the mic; it's too bad he decided they weren't for him - it's an interesting direction for this chameleon of a band.

    Iron Maiden: Piece of Mind - Iron Maiden sweeps me off my feet and takes me on a roller coaster ride of sound in every song. I find it impossible not to tap my feet to this band. If you're going to die, die with your boots on.

    Ozzy Osbourne: Bark at the Moon - While there are some great songs on this third solo album from Ozzy, like the title track, it feels like Ozzy is starting to lose steam on this disc. Ozzy is about to take a couple years off... he'll be back in 1986 with The Ultimate Sin. Hopefully the time away will do him good.

    Pantera: Metal Magic - I have to skip this one. Pantera as we know it didn't really start until 1990 with Cowboys From Hell (which I have). According to Wikipedia, the first few albums were more of a glam rock sound, like Van Halen. Now, I like Van Halen, but I don't necessarily like everything in that genre. I can't find any samples of Metal Magic out there, and since the lowest price I can find for it is about $25, I'll hold this for some other time.

    ZZ Top: Eliminator - This is the golden age of ZZ Top. This album has timeless hits like Legs, Sharp Dressed Man, and Got Me Under Pressure. I have to admit I often skip ZZ Top when it comes up in the shuffle list, but I won't be skipping this album.


    Accept: Balls to the Wall - How did I never hear of this band? This album rocks, and not just the hit title song, either. Whereas the previous album examined the speed of light via the electric guitar, this one slows it down to a middle-of-the-sidewalk swagger, daring you not to step aside. Great stuff.

    Motorhead: Another Perfect Day - I'm not thrilled about jumping around in time on Motorhead; only last month I picked up their debut album from 1977, and now here it is 6 years and 5 (or is it 4?) albums later. But I also like to listen to a year's music in the context of its contemporaries. Since I brought Motorhead into the band list late, I can't satisfy both goals at once.

    Dio: Holy Diver - I have this one already, but I put it on the list because it is the only Dio album I have. I bought it shortly after Ronnie James Dio's death in May, 2010, knowing very little about his solo works. In many ways, listening to and loving this album is what made me start thinking about doing this project. What other great bands have I been missing out on all these years, I asked. By now, I have at least a partial answer.

    03 October 2011

    Applications: The Easy Ones

    See Time For a Change for the first in this series, or view the index to see all the entries dealing with Arch Linux. In this post, I'll install the easy applications.

    Libre Office for word processing, spreadsheets, etc: Easy, but I couldn't nap through it. The command is simple enough (pacman -S libreoffice), but first it asks what members of the package group I want to install - default is all 11 of them. Yup, all of them is fine. Then it asks what language pack I want to use - default is Afrikaans! Um, no, I want US-English... that's #22 with the cryptic name "libreoffice-en-US". A little piece of trivia is that Libre Office is a fork of Open Office, which suddenly is owned by Oracle; the "Libre" part of the name is Latin for free, as in freedom.

    Chromium for web-browsing. Start with the install (pacman -S chromium), but it isn't quite done there. Chromium is what Google Chrome is based on, and comprises just about all the features with none of the privacy-violating hijinks. The only thing it doesn't have that I want is a Flash Player, and that's easy to get, too: pacman -S flashplugin.

    The Gimp for photo editing (pacman -S gimp).

    Audacity for sound editing (pacman -S audacity).

    OpenShot for video editing (pacman -S openshot).

    Wine for running Windows programs under Linux (pacman -S wine).

    Skype for VOIP: Hooray, there's a package for it in the repository (pacman -S skype)! If this were a real machine, I would put in my account details and configure my headset mic. But I've done that before in Linux, and I'm confident I can do it again. No need to fight with USB support in VirtualBox, which can be pretty touchy.

    Netbeans for programming: At the office, I code pretty exclusively in C++, so I have the C++-only version of Netbeans. But here at home I don't want that limitation, so I downloaded the "everything" version, which includes Java and PHP support. Then I just had to run the installer and I was all set.

    I use Pidgin under Ubuntu for an IM client, but Kopete comes pre-installed with KDE, so I decided to give that a try. If I decide to go back to Pidgin, it's in the Arch repository, so I don't expect an issue with it. After entering my account details and digging through the settings to get Kopete just the way I want it, IM was taken care of. Kopete doesn't support Facebook chat, but neither does Pidgin lately, so no big deal.

    I really like Clementine under Ubuntu as a music player, but Amarok is the best-known music player for KDE, and Clementine actually says "inspired by Amarok" on its website. So I gave Amarok a two-song try, and I'm impressed. It can definitely do what I need it to do, and it has a lot of cool features that Clementine doesn't. To install Amarok, I needed a single command: pacman -S amarok

    That's about it for the easy ones. Note that I probably could have installed most of them at once, with this command (all one line):

    pacman -S libreoffice chromium flashplugin gimp audacity openshot wine skype amarok

    After installing all of these apps, I'm left with the tougher ones:

    • PasswordSafe for secure password management
    • Moneydance for personal finance
    • ThinkOrSwim for option trading
    • Minecraft - thought this would be easy, but it crashed on my first attempt
    • Dropbox for cloud storage
    • Kontact for e-mail, contacts, and calendar
    • Choqok for micro-blogging (following and posting to Twitter)
    • NixNote for notes/personal organization
    • Bless hex editor
    • Bacula for automated backups

    Next: ThinkOrSwim
    Or check out the Index

    26 September 2011

    Applications: A Survey

    See Time For a Change for the first in this series, or view the index to see all the entries dealing with Arch Linux. In this post, I'll list some of the applications that make this machine a home.

    When I switched from Windows to Linux, I found myself looking for applications to do things that I took for granted before. Eventually, I settled on my favorite programs for each of these tasks, but in so doing I learned to make some compromises, try new ways of doing things, and found unexpected features. That, in a nutshell, is what this whole Arch experiment is all about. So let's start with a list of activities that need software support, and the apps I use for each of them on Ubuntu today.

    • Word Processing, Spreadsheets, etc: On Ubuntu 10.10, that's all covered by Open Office; on Arch and on newer distro versions, it's Libre Office.
    • Web Browsing: Ubuntu ships with Firefox, but I've been playing around with Chrome lately, and I think I like it a smidge better. One thing that always seems to cause problems is Flash, so I'll watch out for that. The open-source variant of Chrome is Chromium, so that's what I'll use.
    • Secure Password Storage: This is one I don't compromise on. Back in Windows, I used Password Safe, which was originally developed by Counterpane Software, but has since been moved into the open source community. When I went to Linux, I used Wine to let me keep using it. They have a Linux native beta now, which I hope to use on Arch.
    • Personal Finance: I use a java-based program on Linux called Moneydance. It isn't Quicken by any stretch, but it runs natively and gets the job done.
    • Options Trading: I have that account with ThinkOrSwim I've mentioned a few times, and they have their own trading platform. It's also java-based, so I don't expect any problems.
    • Minecraft: a great way to lose an hour, or a weekend. Also java-based.
    • Photo editing: the Linux standard for photo editing is The Gimp. It has nearly as many features as Adobe's Photoshop, and it's free and open source. (psst, it also runs on Windows)
    • Speaking of Adobe, a PDF reader: simple... there is a reader built into KDE called Okular.
    • Cloud Storage: I use Dropbox to carry a bunch of cruft around with me.
    • E-Mail: I use Thunderbird in Ubuntu right now, but it's really annoying me with its constant update nags and insistence on using Firefox to launch links. I'd also like better integration with contacts and calendars, instead of having to use a browser for that.
    • Twitter/Facebook Stream-following: Ubuntu defaults to Gwibber for that stuff, and it annoys me in many ways, but I haven't found a good replacement.
    • Notes / Personal Organizer: I have a free Evernote account, which I use on my Android phone. But Evernote doesn't make a Linux desktop app, so I use an open-source clone that integrates with the Evernote servers called NixNote (formerly Nevernote).
    • Instant Messaging: I ditched the ad-laden, bloated default IM clients a long time ago. Right now I use Pidgin to chat on Yahoo and MSN (or whatever they're calling it these days). There is also a facebook chat plugin, although it doesn't seem to be working lately. Facebook keeps changing its chat protocol, so that's not a big surprise.
    • VOIP: I use Skype to chat with the poker buddies on Friday nights, and hopefully I won't have to go back to booting a Windows machine for that.
    • Programming Environment: At the office, and here at home, I use Netbeans. It has a pretty friendly interface and fairly good code completion and auto-formatting, even if it is pitifully slow when opening a new project the first time.
    • Hex Editor: we nerds occasionally need something a little more precise than a text editor. For that, I use a nice little editor called Bless that I found in the Ubuntu repository one day.
    • Audio Editing: I'm too lazy to go find something better or easier to use than Audacity.
    • Music Player: I use a player called Clementine that I had to work pretty hard to get working in Ubuntu. I really like it, so I'm willing to work fairly hard to get it working in Arch, too. Unless KDE has a better one pre-installed, of course.
    • Video Editing: the first time I went skiing with the camera, I went looking for a video editor and eventually settled on OpenShot.
    • Automated Backups: I have been using Bacula for years. It primarily runs on the file server, so it has very little exposure to the Arch conversion. I just need to get the client running so my machine will get backed up.
    • Windows stuff: sometimes I have to run Windows programs. I hate doing it, but that's life. For that, I use Wine... just like every other Linux user in the world.
    That's a pretty long list! Rather than diving right in, this is probably a good place to stop.


    Next: The Easy Ones

    Or check out the Index

    15 September 2011

    X Windows and KDE

    See Time For a Change for the first in this series, or view the index to see all the entries dealing with Arch Linux. In this post, I will go from the command-line to a KDE desktop. We're getting somewhere this time!

    An awesome Linux machine isn't very awesome if all you get is a root login and a command-line prompt. There are a number of desktop managers out there for Linux, but the two most popular are Gnome and KDE. For this machine, I chose KDE. There are several command-line examples throughout this post, and by a common convention I will prefix the ones that should be done as root with "#", and the ones that should be done as an unprivileged user with "$".

    In Arch, most things are installed with the package management utility: pacman. Other distributions have different but similar utilities: Fedora uses yum, and Debian uses apt. They all do pretty much the same things, and they all have documentation that does its best to convince the reader that each utility is different and somehow better than the others. Whatever. They are just tools to do a job, as far as I'm concerned. Before I get started installing KDE, I need to generally update my system:

    # pacman -Syu

    Immediately after a new installation, this will probably update pacman itself and then dump back to a command prompt, so it's a good idea to run the command twice.

    Next, I need to install X Windows before I install KDE. Linux is laid out in a hierarchical way: there is the underlying kernel, which runs the operating system and does hardware, resource, and process management, but it doesn't have any graphical capabilities. On top of that -- if installed -- is X Windows, which is capable of interfacing with the graphical hardware subsystem and providing a high(er) level framework to applications looking to provide a GUI interface to their users but not wanting to reinvent the wheel, the way DOS games had to back in the day. Finally on top of that is the desktop manager, which puts a pretty face onto X Windows, coordinates a user session, and manages access to the various utilities and menus an average user needs to do his job. Technically, X Windows can be run without a desktop manager like KDE, but no sane person would want to.

    As an example of insanity, here's how to launch the X Windows calculator, and what it looks like:

    $ X &
    $ export DISPLAY=0:0
    $ xcalc &

    And here is the equivalent in KDE:


    Launching KCalc KCalc itself

    Bear in mind that if you want to see more than one application at a time in X Windows, you have to specify the size and coordinates of the windows at launch time. Yeah, I'll stick with a desktop manager.

    So... onward to X and KDE installation!

    # pacman -S xorg

    This takes a while. When it's done:

    # pacman -S kde

    This takes even longer. When that finishes, though, X Windows and KDE are installed. But they need some configuration before they can be used. First of all, I had to add "hal" and "dbus" to the DAEMONS section of /etc/rc.conf - no idea why, just following instructions. In order to get a dvorak layout at the login prompt (very important when you can't see what password you're typing), I also had to add the following highlighted line to the appropriate section of /etc/X11/xorg.conf.d/10-evdev.conf:

    Section "InputClass"
         Identifier "evdev keyboard catchall"
         MatchIsKeyboard "on"
         MatchDevicePath "/dev/input/event*"
         Driver "evdev"
         
    Option "XkbLayout" "dvorak"
    EndSection

    Next, if I want to use KDE I have to create a non-privileged user, because by default root isn't allowed to log into KDE directly. I also need to set a password, create a home directory to store the new user's configuration and personal files, and make sure this user can elevate his privileges to root in case I need to use it to manage the system from within KDE. So I executed the following commands in sequence:


    # useradd mark -d /home/mark
    # passwd mark
     (enter a password)
    # mkdir /home/mark
    # chown mark:mark /home/mark
    # groupadd sudo
    # usermod -aG sudo mark

    Since I had never set up sudo, which lets an authorized user elevate his privileges to super-user, I also had to execute visudo and comment out the line that says that anyone in the "sudo" user group is allowed to use the sudo command. In this way, I have given unlimited power to the mark user, but no one else.

    All that is left now is to make the machine boot directly into KDE instead of to a console login. To accomplish this, I edited the /etc/inittab file. First, there is a section near the bottom that has several example lines for starting various desktop managers. Luckily, there is a KDE one: "x:5:respawn:/usr/bin/kdm -nodaemon". All I needed to do was comment out the "xdm" one that leads to the bare X Windows environment, and uncomment the line above dealing with KDE. Next, there is a line near the top that reads "id:3:initdefault:". Changing this to "id:5:initdefault:" causes the default runlevel to be 5.

    OK, what the heck is a runlevel?

    In a nutshell, runlevels categorize the various services that should be started or stopped based on what task the operating system is carrying out. This is an old concept harkening back to the Unix System V days, but it is still a simple and powerful way to manage a system. The various runlevels in Arch are:

    • Level 0: Halt, aka Shutdown. If you switch to level 0, your machine will power off.
    • Level 1: Single user mode. If you are familiar with Windows Safe Mode, this is like that but more so.
    • Level 2: Not used these days.
    • Level 3: Multi user mode, console login. This was the default level after a bare Arch installation.
    • Level 4: Not used these days.
    • Level 5: Multi user mode, X Windows. This is our target level.
    • Level 6: Reboot. If you switch to level 6, your machine will reboot.

    So by switching my default runlevel from 3 to 5, I make the machine boot straight into KDE. Simple!

    And here it is!

    Next: Application Install
    Or check out the Index

    10 September 2011

    The Arch Installer

    See Time For a Change for the first in this series, or view the index to see all entries dealing with Arch Linux. In this post, I will detail the steps I took to get Arch installed on my virtual system.

    The "Live" Environment
    When you first boot off of the Arch Live CD ISO, you get dropped into a command prompt, as root, with a little message on the screen that reads:

    To begin installation, run /arch/setup
    You can find documentation at /usr/share/aif/docs/official_installation_guide_en

    i18n: Use the 'km' utility to change your keyboard layout and console font.

    If you encounter issues and want to report them or seek help, run /arch/report-issues

    If you are looking to install Arch on something more exotic, such as your kerosene-powered cheese grater, please consult http://wiki.archlinux.org.

    Thankfully, I don't have a kerosene-powered cheese grater. Recall that I have switched myself over to a Dvorak keyboard layout, and I have replaced my old QWERTY-labeled keyboard with an awesome blank-keyed Das Keyboard. So of course the first thing I did was to run km and select a Dvorak layout. Ah, much better.

    Steps 1-3
    Then I ran /arch/setup, and was greeted with this screen (click for a full-size view):


    One might be tempted to jump around, but the installer won't allow that; so I started with the first step. The "select source" task gave me some cryptic warnings about making sure to use the right repositories, lest I hasten The Singularity. Not knowing what was the right or wrong choice, I just chose what was pre-selected by default. We haven't been enslaved by our computers yet, so I guess it wasn't a terrible choice. Back I came to the main menu, with "2 Set editor" helpfully pre-highlighted for me. Choosing this gave me a choice of "vi" or "nano". I'm a vi man, so that one was easy.

    The next one was "set clock". I ended up having to run this installer several times for reasons unrelated to the clock, and eventually I came to the conclusion that getting too wrapped up in setting the clock from here, at least in a VirtualBox Guest, was a sucker's game. So, in my ideal install, I skipped this step.

    Step 4
    "4 Prepare hard drive(s)" may not look ominous to the uninitiated, but I knew from years of experience that this is where the partitioning would happen, and stuff would get tougher. As I explained last time, I have two storage devices in my main desktop computer: a 100GB SSD for fast booting and operating system use, and a 2TB hard drive for main storage. I don't want to devote a multi-gig chunk of my precious SSD to testing an Arch installation, and performance isn't the point of this test. The point is to have two hard drives, one large, one small, and to make sure I know where I want what, and that all my partitions and whatnot work out right. So both of my "drives" are actually contained in files on the 2TB drive. I proceeded with some trepidation to the Prepare Hard Drive sub-menu:


    I put Arch on the laptop for a couple of days for fun a few weeks ago, and when I selected the first entry: "Auto-Prepare", everything worked out great. But that choice isn't appropriate for a multi-drive setup like my test machine. So that means I have to manually partition and configure the filesystems and mountpoints. This is never fun.

    My simulated 8GB SSD mapped to /dev/sda, and my simulated 100GB hard drive mapped to /dev/sdb under the Arch system. By looking at the layout chosen by the auto-prepare option on a single hard drive installation, I determined that Arch likes to have a separate /boot partition. So I created the following partitions and mapped them to various filesystems and mountpoints:

    • /dev/sda1, bootable, 580MB, type="Linux", mounted at /boot, ext2 filesystem. This partition gave me the most problems. I wasn't sure what the right type was, because there were a few options that seemed reasonable, and I wasn't sure what filesystem to put on it. If I chose any combination other than the ones listed here, everything would seem fine until the very last step (8 Install bootloader), and then GRUB would refuse to install.
    • /dev/sda2, remaining 7.5GB, type="Linux", mounted at /, ext4 filesystem. This is the main filesystem root, where all the operating system stuff goes, so that should be on the SSD for maximum performance.
    • /dev/sdb1, 96GB, type="Linux", mounted at /caviar, ext4 filesystem. This is the main storage partition, which in real life would be 1.88TB. Using softlinks, I can map whatever I want into this drive as I use the system in the future. In case you're curious, it's called "caviar" because it is a Western Digital Caviar hard drive.
    • /dev/sdb2, 4GB, type="Linux swap / Solaris", swap. The swap partition on Linux is just like C:\Pagefile.sys on a Windows machine: it's where memory gets written to disk if you start running out, or if you put your machine into hibernate. I located this on the slow hard drive instead of the SSD because I don't expect to use it very often. I can avoid using it by installing more memory, and many people choose to have no virtual memory at all. I prefer to have it available for exceptional circumstances, but I don't want to devote precious SSD space to it. And on a real SSD, there is no real speed gain from putting your machine into hibernate instead of just shutting it down. My desktop machine currently boots into Ubuntu, ready to be used, in about 6 seconds.

    Bear in mind that the choices above were finally determined to be the right ones after many annoying attempts. After each, the Arch Installer would format my hard drives, create the filesystems, and set up the mountpoints. I usually didn't know something had gone wrong for about an hour.

    Step 5-6
    Next are a couple of simple steps. Selecting the packages was easy, since I had no idea what most of them were, and I knew I could install them later if I realized I needed them. However, a couple of extra non-default packages turned out to be a good idea:
    • pacman-mirrorlist - the Arch package management application is called "pacman", and it downloads software packages during install or upgrade from a repository mirror specified in the /etc/pacman-mirrorlist file. If you don't install this off the installation CD, I don't know how you're supposed to use pacman post-installation.
    • sudo - the ability for a normal but authorized user (like the "mark" user) to elevate his privileges to be indistinguishable from "root" without having to type in the root password is very valuable. It's more secure, and it's more convenient. I found I needed it immediately after installing Arch, so it was a no-brainer to put a tick next to this package during the installation process.

    Step 6 - Install Packages is the easiest of all. It tells you to be patient, you hit Enter, and you watch it install stuff without having to do anything yourself.

    Step 7
    In the next step, I needed to create the initial system configuration files. Much of this can be skipped, but it's a good idea to cruise through each file and see if anything jumps out needing changing.

    Arch has a simple System V-style configuration model, where most of the main configuration options are stored in the /etc/rc.conf file. I made a few changes:
    • I changed the TIMEZONE line to read "America/Chicago", which makes my system clock work out right.
    • Under the NETWORKING section, I changed "Interface=" to read "Interface=eth0", which is my one-and-only ethernet card on the machine. By not setting anything else here, I let it use DHCP to get its networking details. In the real world, I can start this way, but I'll want to change it to a static private IP so that other machines on the McHouse Enterprise Network can find it. 
    • I set the machine name to "arch64test" here, and also in /etc/hosts.
    • I did not have to change my keyboard layout, because the installer automatically propagated my choice of "dvorak" into the rc.conf. But if I hadn't bothered before, I could have set it system-wide here.

    There are several other configuration files that are available for adjustment at this stage, but rc.conf is the main one of importance. I added "arch64test" to the /etc/hosts file so it would match the rc.conf, and I also set a root password in this step, so I don't forget to do it later.

    Step 8
    Installing the bootloader (GRUB) is an infuriating step. The installer fails cryptically if it doesn't like something about the partitions chosen way back in Step 4, and your only choice is to effectively start over. Also, the Arch Installer makes a big deal about forcing you to look at the /etc/grub.conf, even though the contents never need changing. The first time I landed here I felt this sense of responsibility, like I had to verify every line in the file for correctness - tough when I didn't even understand every line! After going through this step five or six times, I became pretty comfortable with just instantly exiting out of the file when it popped up on the screen.

    Success!
    Eventually everything went well, and I kept my fingers crossed during the GRUB installation, and the installer exited successfully. That let me remove the install CD and reboot into my brand new Arch installation, which looks like this:


    Now what? It's not exactly the multimedia experience we have all come to expect from our PCs these days. That's the thing about Arch, though: it is exactly what you make it. It doesn't try to guess what you want your desktop to look like - it gives you the power and the responsibility to do it yourself.
    Next: X Windows and KDE
    Or check out the Index


    06 September 2011

    VirtualBox

    See Time For a Change for the first in this series, or view the index to see all the posts dealing with Arch Linux.

    VirtualBox is well-documented on its website and on Wikipedia, and I see no reason to rehash that information. However, I want to discuss how I use it when testing a new desktop installation like Arch. It really works perfectly for my needs and I hope that now that Oracle owns it they won't screw it up like everything else they've touched (I'm looking at you, Java). Other similar products exist, including VMWare, KVM, and xen. After reading about them and trying them, I found VirtualBox the most intuitive, so that's what I use.

    It begins with deciding what hardware the virtual machine will have. I like to approximate my real desktop machine as much as possible, so that I can encounter as many problems as I can before I wipe my hard drive. My desktop machine has a 4-core i7 processor, 6GB of memory, a 100GB SSD for operating system and fast-access files, and a 2TB hard-drive for main storage. The graphics card is nothing notable, since I don't really use this machine much for gaming, but for completeness it's an nVidia, and I am running the proprietary drivers for it. I'm running 64-bit Linux, as any reasonable person would with 6GB of memory. And I have a little stone skull sitting on the keyboard.

    Obviously, since the virtual machine (known as a "guest") is running within my main machine (known as the "host"), it has to be smaller in every way, but it should have a similar footprint. So the guest is a dual-core processor, running in 64-bit mode, with 2GB of memory, an 8GB hard drive that I treat like the SSD, and a 100GB hard drive that I treat like the main storage drive. VirtualBox also gives me as many CD/DVD drives as I want, and I have one in there. Sound, network, graphics are all stock, supported by VirtualBox. Except for nVidia-specific driver issues, I have all the hardware likely to give me trouble in a real installation. Sadly, no skull on that keyboard. Now I need some software.

    Next I download the Arch installation media, also known as the ISO. If you aren't familiar with an ISO, it is basically a CD in a file. I can burn it straight onto a disc or USB memory stick and have exactly what I would get if I ordered the hard media. But since I'm using VirtualBox, I can also mount it directly, without having to put it on anything physical. All I have to do is select the ISO file for insertion into the virtual CD/DVD drive, and to the guest machine it looks like a new disc was just loaded into the tray. By adjusting the boot order in the VirtualBox management application, I can have my guest machine - which I very creatively called "Arch64Test" - boot straight from that ISO file as if it were physical media. That starts the Arch Live environment, from which I can install onto the hard drive. When I'm done with the ISO, I click a little icon in the status bar of the guest's window, and select "Eject Disc". Simple!


    That's about it for the VirtualBox details, but there is one other feature that is really key for this type of activity: snapshots. I can take a snapshot of a guest machine any time I want (as long as it isn't running), and VirtualBox gives me a checkpoint. I can have as many of these checkpoints as I want, and they end up like a set of stills depicting the guest machine at various stages of its life. If at any time I want to roll back to a particular snapshot, I can do so from within the management application. I can't do this lightly, though, because rolling back to a previous snapshot throws away all changes to the machine since that snapshot. But if I'm having trouble getting something installed correctly, being able to roll back to just before I started screwing up the machine is really important.

    Next: The Arch Installer
    Or check out the Index